Gardening, with the aim of providing your own food, has experienced a resurgence over the last few years.
More and more of us are looking for ways to reduce our food bills, decrease our carbon footprint, and eat healthier.
Those with gardens or access to an allotment find it easier to grow their own food, but what about those of us who live in apartments?
Apartment dwellers have much less space to work with, and this obstacle stops many budding gardeners in their tracks.
That is why we were excited to learn about upside down gardening; it grants everyone the opportunity to grow their own vegetables regardless of available space.
Here’s what the experts at Fantastic Gardeners advise in order to get yourself up to speed with an upside-down garden.
Upside-down gardening - definition
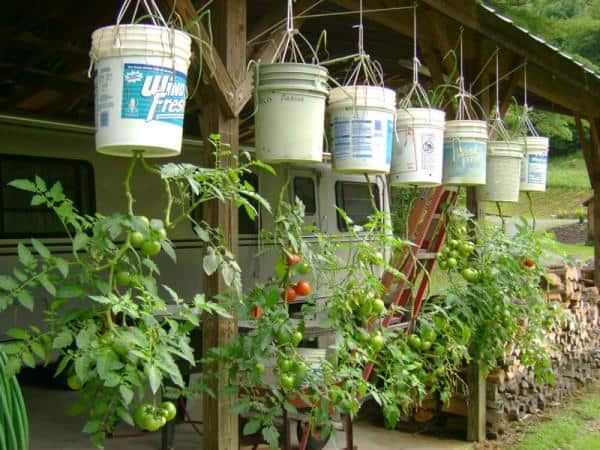
Upside down gardening is growing plants in pots suspended from the ceiling, balcony, or deck.
This style of gardening started to gain popularity in 1998 when gardener Kathi Lael Morris showed that it is possible to grow tomatoes and peppers in hanging pots.
Many traditional gardeners viewed this style of gardening as a fad with little chance of being widely adopted.
Unsurprisingly, people with no garden space quickly realized the benefits of this method and how they were no longer excluded from being able to grow their own food.
What plants can you grow upside down?

Most plants can be grown upside down, but those that benefit the most include:
If you want to get the most out of your available space, you can consider planting herbs at the top of the hanging pots instead of planting them separately.
Benefits of upside down gardening
Upside down gardening presents benefits to those with gardens and those without. However, the advantages are more apparent in urban environments.
- Pests – As the plants don’t come into contact with the ground, there is a much, much smaller chance that they will be affected by pests such as aphids.
- Space – This is the biggest benefit offered by upside down gardening; you don’t need a garden or a lot of space.
- Rot/disease resistance – Another advantage of the plant not touching the ground is that the roots, stems, and fruit are less susceptible to rotting or contracting a disease.
- Staking – Since the plants grow downwards, you don’t need to stake them to optimize growth.
- Weeding – Growing plants traditionally requires a lot of time and attention, most of which is taken up by the need to weed.
Now, before you get all excited about this revolutionary way of growing plants, there are certain drawbacks you should be aware of.
First and foremost, plants are likely to break when it's too windy due to their U-turn upward growth.
Besides, the hardware that supports the weight of the plant and planter may not be strong enough to hold your mini garden.
What you need to get started

Upside-down gardening of tomato
Creating your personal hanging garden of Babylon does require some supplies and a little bit of work, but it will be worth it when you can eat hand-grown produce.
What you need:
- A strong hook
- Strong string or metal wire
- A 7.5cm (six-inch) circle of foam or sponge
- Lightweight soil or compost
- A large bucket
- A sharp knife
- A marker pen
- A tray to catch water
- A young plant
When you have collected your supplies, simply follow the steps below:
1. Find the sunniest area of your home and mark the ceiling where the pots will be,
2. Install the hook,
3. Now turn your bucket upside down and draw a 5cm (2 inches) circle in the center,
4. Using the knife, carefully cut around the circle to make a hole,
5. Turn the bucket back around and make three evenly spaced holes roughly 2.5cm (1 inch) down from the lip of the bucket,
6. Tie the string or metal wire through each hole to make three loops that are the same size,
7. Cut a 1.75cm (half an inch) hole in the middle of the sponge (or foam), then cut a line running from the hole to the outside,
8. Place the bucket on its side and carefully thread the roots through the hole in the bottom. Make sure the plant is on the outside of the bucket,
9. Secure the plant by placing the sponge (or foam) around the base of the plant inside the bucket,
10. Have someone hold the bucket off of the ground and add soil until it is roughly half full,
11. Water until the soil is moist,
12. Add more soil until the bucket is roughly three-quarters full,
13. Hang the bucket,
14. Place the water catcher beneath the bucket,
15. Water the plant again until the new soil is also moist.
The great thing about using buckets instead of large plant pots is that you can decorate the buckets.
Take this opportunity to release your inner artist and introduce some bright colors or funky designs to your home.
Decorating the buckets and creating a hanging kitchen garden is an enjoyable learning activity for teaching children about where food comes from as well as how to care for plants.
Caring for an upside down garden
Looking after your new hanging garden is quite easy since you don’t have to worry about weeds or pests. All you need to do is:
- Remove any dead or dying leaves;
- Water the plants daily during hot, dry periods;
- Water every other day during the rest of the year;
- Harvest any ripe fruit and vegetables.
Conclusion
So there it is, your guide on how to grow a hanging kitchen garden.
With this style of urban gardening, you’ll be eating home-grown fruit and veg in no time, regardless of whether you have a garden or not.
This is a guest post provided by Fantastic Gardeners, a garden maintenance and landscaping company based in London and Manchester, United Kingdom.
Editor's Note: This post was originally published on July 30, 2017, and has been revamped and updated for accuracy, grammar, and comprehensiveness.
Interesting way of meeting the demand for food worth adopting
Awesome! Thanks for sharing this.
Interesting. Will be an exciting women managed activity for lower middle class families living in apartments worldwide.
My first reaction is the possible stress effect of upside down growth for the plants.
good innovative idea. what is the advantage of up dide down method compared with normal potted/ container plant.
Nice method of planting.. well in fact i have already tried it and see how my plant is progressing.. Awesome.. Thank you for boosting our efforts in gardening..
Interesting blog.
I have tried chilli and they grew sucessfully but i failed to do it with my tomatoes